How to Setup Website Monitoring

Managing the website is a complex task that requires day-to-day attention from the website’s owner or webmaster. Website monitoring, in turn, is an essential part of the website maintenance routine.
Basically, it is a cornerstone of everything, because it delivers detailed information about the website to the person responsible for its maintenance. And to do the website monitoring with most effectiveness, it is vital to understand how to setup website monitoring properly.
And for it, obviously, you need the most powerful tools - an online toolkit by Host-tracker.com with easy-to-use configuration and full automation. Otherwise your monitoring routines will be lacking in efficiency and will produce not too satisfying results for the website maintenance.
Why Website Monitoring Tools Are Important?
Website monitoring in itself is not too hard in terms of understanding everything about how it works and why it’s needed. To put it simply, without it you won’t be able to properly check the status of the website you’re working with. And therefore, you won’t be able to react to various emergency situations that are bound to happen from time to time, sometimes highly severe.
In such situations, if unprepared and without monitoring, every website owner or webmaster will respond slowly, leading to reputational and financial losses due to prolonged issues with the website.
Taking everything above into account, not only monitoring itself is important, but also tools that are used for it. Because if monitoring tools are not too effective or informative, responding to occurring issues with the website will be slower than when using powerful and quick tools. Obviously, you need and want to use the best solution available all over the Internet.
And the HostTracker website monitoring platform offers its users an access to the said best solution with its wide variety of checks and tests that are working in real-time and fully automatically.
Host Tracker Checker: How to Setup Website Monitoring
Setting up the website monitoring routine is nothing hard if you’re working with a convenient platform like HostTeracker. It was designed and developed precisely with the ease-of-use in mind and is basically accessible to novices and professionals alike.
Therefore, setting up a monitoring routine, no matter how complex, will be relatively easy for everyone:
- Sign In or register and Sign In into the HostTracker dashboard.
- Press the ‘Add’ button at the upper left corner of the dashboard.
- Pick the check type from the ‘Monitoring type’ dropdown.
- Type or copy-paste IP or domain name of the website you want to monitor.
- Name a task conveniently for future use.
- Configure additional options and monitoring schedule intervals.
- Pick locations from where to execute checks at the ‘Locations’ tab.
- Set up instant alerts at the ‘Notifications’ tab.
- Choose the frequency of the reports from the check at the ‘Reports’ tab.
- Press the ‘Save’ button to start conducting tests in accordance with the configuration.
You can run everything manually, of course, but if you sign up and set up an automated check, you’ll be able to get this information in real time whenever you want, and the system will even send you notifications in case of emergencies.
![]()
Check Website Response Time
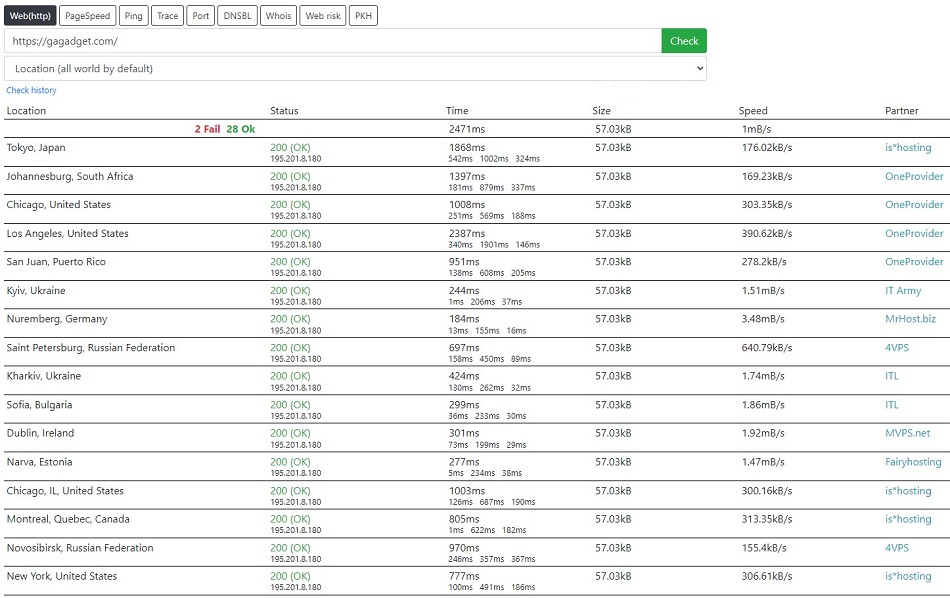
One of the first tools you need to set up for effective website monitoring is the response time check or, namely http checker, to determine how quickly the website’s users gain access to the website if they actually can.
This is the most basic check among the basics, and you should set up this check before everything else. It will become a foundation for all other diagnostics routines with its essential metrics and results.
- If additional options are available, it is possible to add web risk, DNSBL, domain name and SSL certificate monitoring to the HTTP check by marking the corresponding options during the setup at the bottom of the ‘Main’ tab.
Functionally speaking, this tool will show the website’s status, its response time, actual page size after loading and average network access speed. Those metrics are vital to understanding an overall status and performance of the website without taking anything complex into account.
The results of the check will show exactly what you need for basic diagnostics - current accessibility status, response time, network speed depending on the user’s location. and the size of the fully loaded page. And you will be able to determine whether there are issues with it as soon as you see the report from the HostTracker system. For example, if page status is not ‘200 OK’ then there are issues with the website that are shown in the HTTP response code.
- Using the ‘Advanced’ tab during the setup of the HTTP checker, it is possible to exclude particular HTTP codes from the alerts list, and the tool will ignore them during routine tests.
- To check ‘401 Unauthorized’ you can provide the required username and password to the tool during the setup using the ‘Advanced’ tab.
If the response time is too long compared to Google standards, then there are server-side issues you should be looking for. When the speed differs, then you should look into networking routes to and from the user.
And if the size of the page varies depending on the location or loading speed, then not all users can get access to the content on the page and you should look for a way to fix the issue.

Website Ping Check
Another check that should be obviously set up before others, ping website test is a basic accessibility checking routine that will help with determining the connection between the users and the website. Basically, when you ping website with HostTracker tools, it sends a packet to the target website from a variety of locations, waits for the response and then shows the result.
The ping utility shows more than a simple website’s availability status. As a result of the diagnostics routine, you will get a response status with the corresponding code, just like with HTTP check, packet loss percentage if any packets were lost during any of four tries, and network lag (also known as ‘ping’) or delay between sending packets and receiving a response.
If there’s something wrong with the result of the scheduled ping routine, the HostTracker system will obviously send a notification to a person responsible for the website. And it will be easy to determine where the problem is. If the website status is other than ‘Good’ - you probably will get an alert and more info from HTTP check simultaneously. When there’s a packet loss, then check the network stability and routes.
And, finally, if the response delay is too long from certain locations, then check the network and the distance between the website and the check’s designated location. Basically, use the traceroute to check the reason for network delays. CDN could be the solution to the issue if you haven’t set up one already. Or, alternatively, you should check the website and server performance.
Online Traceroute Analyzer
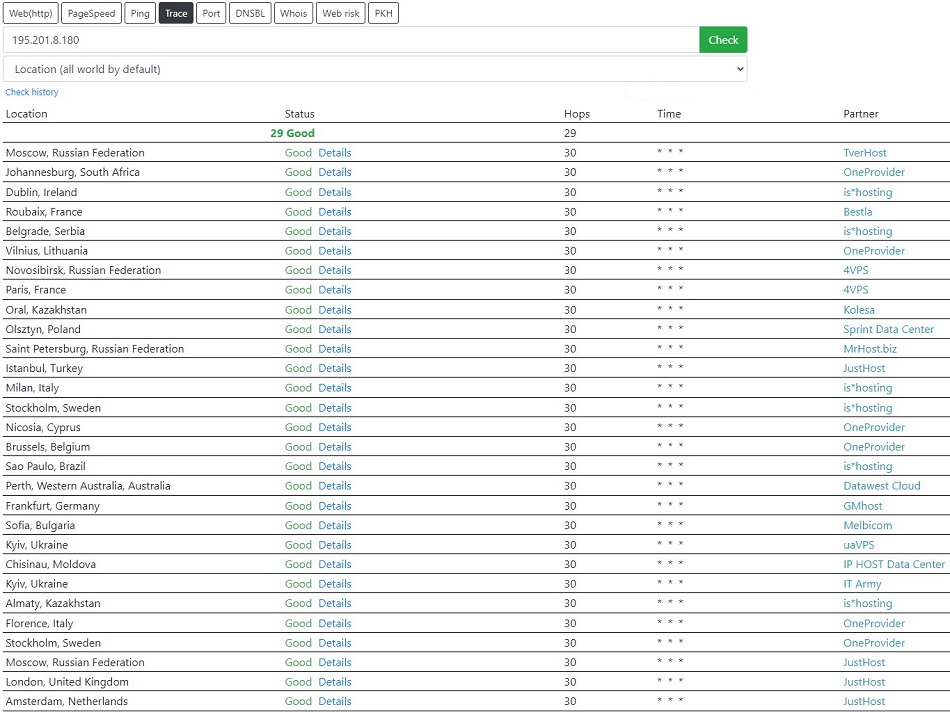
Traceroute is basically an addition to the HTTP response time checker and ping routine. In a nutshell, this is a manually launched traceroute online utility at HostTracker that checks the network route from the user to the website. It’s useful in itself, but this tool doesn’t require constant usage - networking routes are changing very rarely.
Therefore, it is more logical to use it as the solution to check possible networking problems in case of abnormally high response time with high delays usually accompanying such issues in tow.
- Traceroute utility is available to HostTracker users under the ‘Trace’ tab on the ‘Instant checks’ page. It is accessible with the ‘Instant checks’ button at the left panel of the dashboard.
As with other checks and tests available at HostTracker platform, all that’s needed to run traceroute check is to know the IP or domain name of the website. With onу of those you will be able to run the tool and check the network route between the website and the users. As the result, you will get the info about the current website status, route between the starting point and the destination (website), and overall response time.
If the status is other than ‘Good’ - press the ‘Details’ button and check where the issue is on the route. If time on one of the tries is too long - do the same and and find out about the causes of the problem through the corresponding option.

How to Use a Port Checker
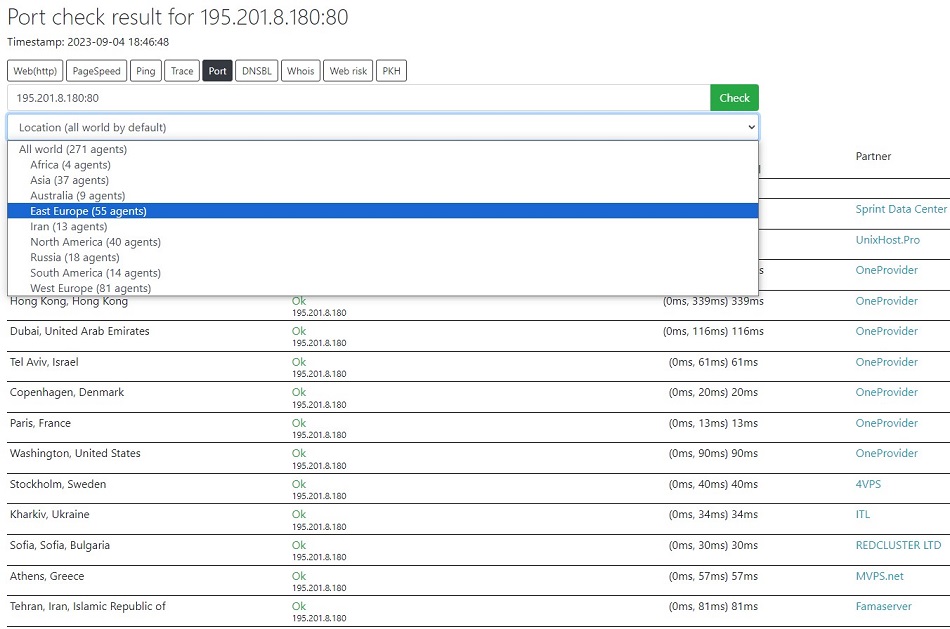
Using a port checking utility at HostTracker service is a more advanced way to test the website’s availability than ping or HTTP check. Because basically, it’s not the accessibility check in general, but accessibility check for a specific port.
It is useful when you want to prevent unauthorized access to the website or to the server through specific ports and want to check whether those ports are closed. Or if, on the contrary, you need some ports to be constantly opened (for third-party applications, etc.) and want to check on them regularly.
- HostTracker port checker tool uses port 80 (UDP) by default. To specify a port for your check, use the domain_name.com:## or IP:## template, where ## is the number of the port you want to check.
Port checking tool shows almost the same results as other tools - the website’s status and overall response time. And when the status is usually ‘Good’ or requires diagnostics, time is a little bit more complex metric.
It shows three different timings - one for the DNS server response, one for the actual server response and one for overall timing and port response. This method is required for understanding of what could cause delays in port access in case of too long overall response time.

Blacklist IP Address Check
In the modern world, the blacklist checker at HostTracker is one of the most useful tools for everyone who works with sensitive content, goods and services that could be marked as inappropriate in some countries.
And the ip blacklist check tool allows one to know about such blocks at the very instant those were issued by DNSBL services and databases. With the help of this tool, although everyone hopes they won’t need it, it is possible to quickly react to DNS blocks and prevent the website from becoming inaccessible to its users due to such blocks.

In terms of usage and report complexity, on the contrary to other checks, this one has almost no information. Basically, DNSBL check only shows the number of scanned blacklists and whether the website is present in one of them or completely absent from all of them. And if the website was included in the DNS blacklist database, it will show the reason why.
How to Check Owner of Domain
Domain ownership is a very sensitive topic for any website owner. Especially when the website is tied to business and the domain was picked specifically for it to fit the business name and purpose. It makes domain owner checks very useful when picking one for the website and when already owning one.
It literally allows one not to miss domain expiration date and renew it before competitors if there are any. And the check domain owner tool at HostTracker was designed with this particular task in mind. It is worth mentioning that although domain checking is based on WHOIS utility and uses the same databases, it works slightly differently and produces fewer complex results.
- Manual domain information checking tool, or WHOIS, is available to HostTracker users under the ‘WHOIS’ tab on the ‘Instant checks’ page. It is accessible with the ‘Instant checks’ button at the left panel of the dashboard.
Just like other tools accessible at this monitoring platform, domain expiration checker can be set up to work automatically on a scheduled basis and it can be paired with the built-in notifications system. Its reports will basically show you everything you need to know about the domain if you want to claim it or if you already own it and want to keep it. And the HostTracker notifications system will send a message before domain ownership expiration date comes.
Conclusion: How to Setup Website Monitoring
Taking everything that was mentioned into account, you should pretty much understand how to setup website monitoring with HostTracker toolkit, how specific basic and advanced tools work and what you should get as the result. Setting everything up is relatively easy and requires only knowing IP or domain and a few clicks at the platforms’s dashboard.
All this knowledge will be of help whenever you need this powerful set of tools to look after your website to aid your maintenance routines. And all in complex, monitoring and maintenance alike, will help you with keeping your website accessible, stable and at the ready for future development and promotion.
