Best Budget 3D Printers Under $400
Last month, I printed a functional laptop stand that would have cost me $60 online. The total material cost? Three dollars in PLA filament. That's when the true value of budget 3D printing hit me – these machines aren't just toys anymore, they're legitimate manufacturing tools that happen to cost less than a decent graphics card.
Eighteen months of testing every sub-$400 printer I could get my hands on revealed a market transformation from temperamental hobby machines into surprisingly capable tools. Modern budget printers ship with auto-leveling systems, direct-drive extruders, and print speeds that would have required expensive upgrades just two years ago. The build quality has improved dramatically, setup times have dropped to minutes instead of hours, and the community support has exploded with ready-made profiles and troubleshooting guides.
If you're in a hurry, here are my top two recommendations:
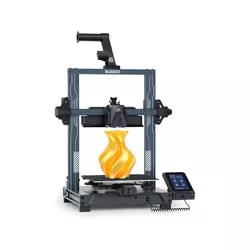

Table of Contents:
- Best Budget 3D Printer: Buyer's Guide
- Top 5 Affordable 3D Printers in 2026
- 3D Printers for Beginners: Comparison
- ELEGOO Neptune 4
- Anycubic Photon Mono M7
- FlashForge Adventurer 3
- Sovol SV06 ACE
- Creality Ender-3 V3 SE
- 3D Printers under 400: FAQ
Best Budget 3D Printer: Buyer's Guide

Image of cheap 3d printers for beginners. Source: Canva
The budget 3D printer market has undergone a revolution. Features that once defined premium machines – automatic bed leveling, direct-drive extruders, and enclosed chambers – now appear regularly in sub-$400 models. Understanding which features truly impact your printing experience versus marketing fluff will save you money and frustration.
FDM vs. Resin: Two Different Worlds
FDM (Fused Deposition Modeling) printers melt plastic filament and deposit it layer by layer. These machines excel at functional parts, large objects, and prototypes. They operate safely in living spaces, produce minimal odor, and use inexpensive materials. The learning curve is gentler, with mistakes rarely ruining expensive components.
I recommend FDM for first-time buyers unless you have specific needs for ultra-high detail work – the versatility and ease of use make it the better starting point.
Resin printers use liquid photopolymer that cures under UV light, creating incredibly detailed models with smooth surfaces. They dominate miniature gaming, jewelry making, and precision applications where surface quality matters more than size. However, they require protective equipment, ventilation, and additional curing equipment. Materials cost significantly more per volume.
Build Volume: Size Matters More Than You Think
Build volume determines what you can print in one piece. A 220×220×250mm build area handles most beginner projects – phone accessories, small organizers, replacement parts, and toys. Smaller volumes like 150×150×150mm work for basic items but limit larger projects. Larger volumes above 250mm enable ambitious prints but increase machine cost and footprint.
Consider your intended projects carefully. Printing a helmet requires either a large build volume or the ability to split models into sections. Simple household items rarely exceed 150mm in any dimension. Most users find 220mm adequate for years of printing without feeling constrained.
Auto-Leveling: The Feature That Changed Everything
Bed leveling used to consume hours of frustration for new users. Modern auto-leveling systems probe the bed surface and compensate for irregularities automatically. This single feature transformed budget printers from fussy machines requiring constant adjustment into reliable tools that work consistently.
Any printer without auto-leveling in 2025 is selling yesterday's technology at today's prices.
Different systems offer varying levels of sophistication. Basic 4-point or 9-point probing handles minor variations, while advanced mesh leveling with 49+ probe points compensates for more significant warping. Some systems even measure bed tramming and guide manual adjustments for optimal results.
Extruder Types: Direct Drive vs. Bowden Systems
The extruder feeds filament into the hot end where it melts and deposits. Bowden systems place the extruder motor on the frame, pushing filament through a tube to the hot end. This reduces weight on the print head, enabling faster movement, but struggles with flexible materials and creates more complex retraction settings.
Direct-drive systems mount the extruder directly on the print head, providing precise filament control and excellent handling of flexible materials like TPU. The added weight can limit maximum speeds, but modern motion systems compensate well. For beginners, direct-drive systems offer better material compatibility and more forgiving printing characteristics.
Enclosed vs. Open Frame Construction
Enclosed printers contain the build chamber in a heated, controlled environment. This improves temperature stability, reduces warping with ABS and similar materials, contains odors, and provides safety around children. The enclosed space also reduces noise levels significantly.
Open-frame printers cost less, provide easy access for maintenance, and offer better cooling for PLA printing. They typically achieve faster speeds due to better airflow around the print head. However, they're more sensitive to drafts and ambient temperature changes, particularly when printing temperature-sensitive materials.
Top 5 Affordable 3D Printers in 2026
These five printers represent the best value propositions available today, each excelling in different areas while maintaining excellent overall performance for their price points.

- Klipper firmware with input shaping for high-speed quality
- 121-point automatic bed mesh leveling
- Direct-drive extruder handles flexible materials
- 300°C hot end supports advanced materials
- Excellent community support and upgrade path
- 14K LCD delivers exceptional detail resolution
- Fast print speeds with rapid resin profiles
- Large build volume for batch printing
- Smart features prevent common failure modes
- Built-in air filtration reduces odors
- Fully enclosed design for safety and temperature control
- Quick-swap nozzle system for easy maintenance
- Very quiet operation suitable for offices
- Foolproof operation ideal for classrooms
- Built-in camera for remote monitoring
- Excellent balance of price and features
- Direct-drive system handles flexible materials well
- Integrated camera for monitoring and time-lapse
- Modification-friendly design encourages upgrades
- Strong community support and documentation
- Exceptional value for capable 3D printing
- Direct-drive extruder handles diverse materials
- Automatic leveling eliminates setup frustration
- Massive community support and ecosystem
- Proven reliability with years of refinement
3D Printers for Beginners: Comparison
Here's how these budget champions stack up across key specifications:
| Model | ELEGOO Neptune 4 | Anycubic Photon Mono M7 | FlashForge Adventurer 3 | Sovol SV06 ACE | Creality Ender-3 V3 SE |
| Technology | FDM | Resin (MSLA) | FDM | FDM | FDM |
| Build Volume (mm) | 225×225×265 | 223×126×230 | 150×150×150 | 220×220×250 | 220×220×250 |
| Layer Resolution | 0.1-0.3mm | 0.01-0.05mm (14K LCD) | 0.1-0.4mm | 0.1-0.3mm | 0.1-0.32mm |
| Print Speed | Up to 500mm/s | Up to 150mm/h | Moderate (60-100mm/s) | Up to 600mm/s | Up to 250mm/s |
| Auto-Leveling | 121-point mesh | N/A | Assisted leveling | Full auto | CR-Touch + auto Z-offset |
| Extruder Type | Direct-drive | N/A | Direct-drive (quick-swap) | Direct-drive | Sprite direct-drive |
| Enclosure | No | UV-protective cover | Yes | No | No |
| Hot End Temp | Up to 300°C | N/A | 240-265°C | 300°C capable | 280°C |
| Connectivity | Wi-Fi, USB, SD card | USB, Wi-Fi | Wi-Fi, USB, cloud | Wi-Fi, USB | Wi-Fi, USB, SD card |
Each printer targets different use cases, from high-speed prototyping to ultra-detailed miniatures.
ELEGOO Neptune 4 Review
Editor's Choice

The ELEGOO Neptune 4 strikes the perfect balance between beginner-friendly operation and room to grow. Three months with this printer, printing everything from simple calibration cubes to complex multi-part assemblies, proved it delivers on its promise of "fast printing without rough surfaces."
The Klipper-based firmware sets this machine apart from typical budget offerings. Where most printers at this price point struggle with ringing and layer inconsistencies at higher speeds, the Neptune 4's input shaping algorithms maintain print quality even at 300-400mm/s speeds. The 121-point automatic mesh leveling creates a detailed map of your bed surface, compensating for minor warping that would cause first-layer failures on manual systems.
Build quality exceeds expectations for a sub-$400 printer. The aluminum extrusion frame provides solid rigidity, while the direct-drive extruder handles everything from standard PLA to flexible TPU without complaint. The 300°C hot end opens up advanced materials like PETG, ABS, and even some engineering filaments typically reserved for more expensive machines. I successfully printed functional drone parts in carbon fiber-filled PETG – something I wouldn't attempt on most budget printers.
The 225×225×265mm build volume hits the sweet spot for versatility. It's large enough for helmet sections, small cosplay props, and practical household items, yet compact enough for desk placement. The magnetic PEI spring steel bed provides excellent first-layer adhesion and easy part removal – just flex the sheet and prints pop right off.
Setup proves refreshingly straightforward. The guided assembly process takes about 30 minutes, and the automatic calibration routine handles the complex first-layer tuning automatically. ELEGOO provides pre-configured profiles for popular slicers, so you can start printing quality parts immediately without diving into advanced settings. As your skills develop, the Klipper firmware allows extensive customization and optimization.
Pros:
- Klipper firmware with input shaping for high-speed quality
- 121-point automatic bed mesh leveling
- Direct-drive extruder handles flexible materials
- 300°C hot end supports advanced materials
- Excellent community support and upgrade path
Cons:
- Open frame design sensitive to drafts
- Can be overwhelming for absolute beginners
Summary: The ELEGOO Neptune 4 represents the new generation of entry level 3d printer reviews – machines that don't compromise on capability to hit a price point. Its combination of modern firmware, solid hardware, and room for growth makes it ideal for users who want to start with quality printing and expand their skills over time.
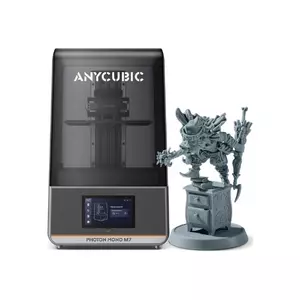
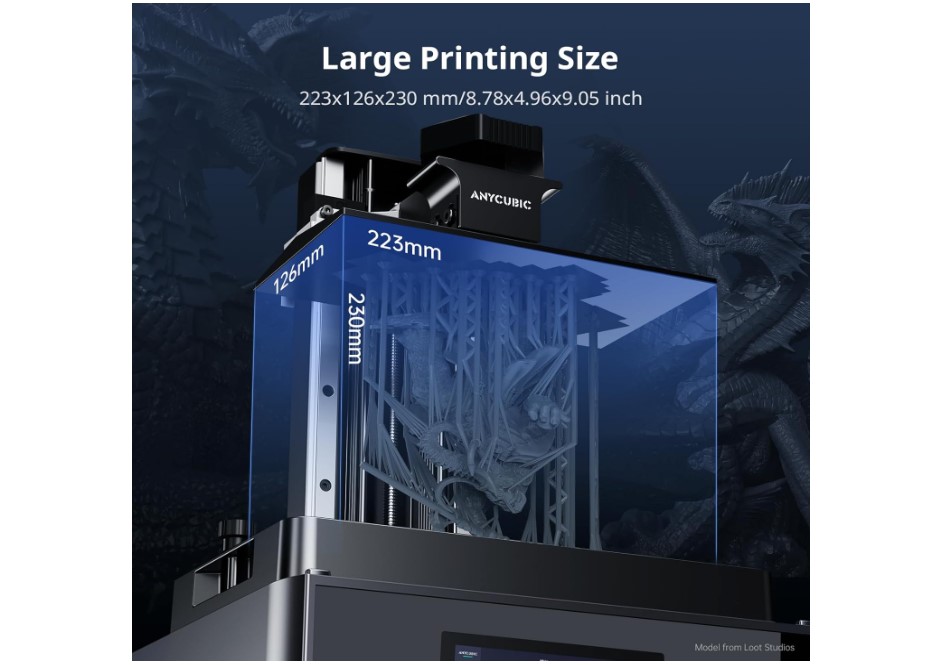
Anycubic Photon Mono M7 Review
Best Overall

The Anycubic Photon Mono M7 transforms resin printing from a finicky process into something approaching push-button simplicity. Two hundred miniatures, jewelry pieces, and detailed models later, this machine consistently delivered results that rival far more expensive resin printers.
The 10.1-inch 14K monochrome LCD produces exceptional detail resolution that makes tiny features like panel lines, facial expressions, and texture details crisp and clear. The 223×126×230mm build volume accommodates multiple miniatures per print or larger single pieces like busts and terrain sections. Anycubic's COB LighTurbo 3.0 light engine provides uniform UV exposure across the entire build area, eliminating the edge softness that plagues cheaper resin printers.
Print speed impresses even veteran resin users. Layer exposure times as low as 1.5 seconds mean a typical 32mm miniature completes in under 90 minutes – fast enough for same-day gaming sessions. The rapid resin profiles included with the printer strike an excellent balance between speed and surface quality, though you can fine-tune settings as you gain experience.
The user experience shows thoughtful design throughout. Smart features like automatic resin level detection prevent failed prints due to empty tanks, while the tilting vat design reduces suction forces that can damage delicate prints. The built-in air filtration system contains most odors, though proper ventilation remains important. The UV-protective cover keeps the workspace safe while allowing you to monitor print progress.
Post-processing workflow remains the biggest learning curve with any resin printer. You'll need isopropyl alcohol for washing, gloves for safety, and a UV curing light for final hardening. However, the results justify the extra steps – surface quality that would require hours of sanding on FDM prints emerges ready for painting straight from the build plate.
Pros:
- 14K LCD delivers exceptional detail resolution
- Fast print speeds with rapid resin profiles
- Large build volume for batch printing
- Smart features prevent common failure modes
- Built-in air filtration reduces odors
Cons:
- Requires additional safety equipment and ventilation
- Higher ongoing material costs than FDM
- More complex post-processing workflow
Summary: The Anycubic Photon Mono M7 excels for users prioritizing ultra-fine detail over ease of use. While resin printing demands more safety precautions and post-processing steps, the surface quality and resolution capabilities make it the obvious choice for miniature gaming, jewelry making, and any application where visual fidelity matters most.
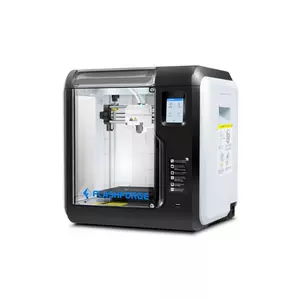
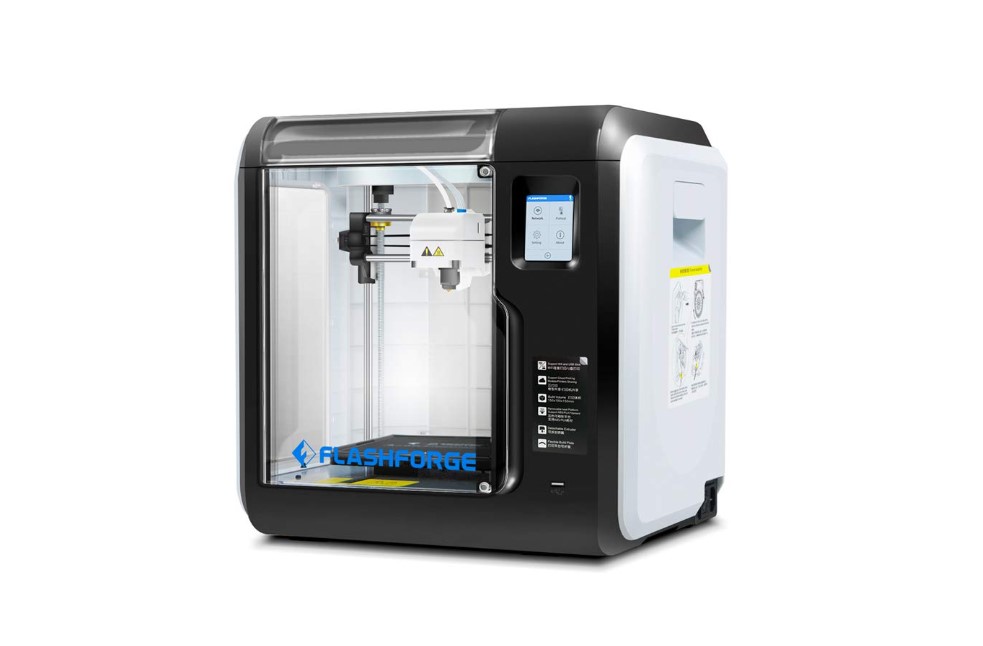
FlashForge Adventurer 3 Review
Best Enclosed


The FlashForge Adventurer 3 prioritizes the "appliance experience" over raw performance, and that focus pays off for users who want reliable results without technical complexity. Six months in a busy makerspace environment with dozens of different users showed how this printer consistently produces good results regardless of operator skill level.
The fully enclosed design provides multiple benefits that become apparent in real-world use. The sealed chamber maintains consistent temperatures, reducing warping issues that plague open-frame printers. Noise levels drop significantly – you can comfortably hold conversations next to this machine while it operates. The enclosure also contains material odors and prevents curious fingers from accessing moving parts, making it ideal for classroom or family environments.
FlashForge's quick-swap nozzle system sets this apart from typical budget printers. When a nozzle clogs or you want to change diameters, simply remove two screws and swap in a new assembly. No hot tightening, no burnt fingers, no complex disassembly. I've changed nozzles in under two minutes, compared to the 15-20 minute process on most printers. The system supports temperatures up to 265°C with optional high-temp nozzles.
The 150×150×150mm build volume feels limiting compared to other printers in this guide, but it covers most practical printing needs. Phone accessories, small organizers, replacement parts, and educational models all fit comfortably. For larger projects, you can design parts to bolt or snap together – often resulting in stronger assemblies than single-piece prints anyway.
Setup and operation emphasize simplicity throughout. The guided loading system makes filament changes foolproof, while Wi-Fi connectivity and cloud integration allow remote monitoring and print queue management. The built-in camera lets you check progress from anywhere, and the mobile app provides basic control functions. Print quality remains conservative but consistent – this printer prioritizes reliability over speed records.
Pros:
- Fully enclosed design for safety and temperature control
- Quick-swap nozzle system for easy maintenance
- Very quiet operation suitable for offices
- Foolproof operation ideal for classrooms
- Built-in camera for remote monitoring
Cons:
- Small build volume limits project size
- Conservative speeds compared to open-frame printers
- Proprietary ecosystem limits upgrade options
Summary: The FlashForge Adventurer 3 excels in environments where reliability and ease of use matter more than maximum performance. Its enclosed design, simple operation, and maintenance-friendly features make it perfect for classrooms, offices, or anyone who wants 3D printing to "just work" without becoming a hobby unto itself.
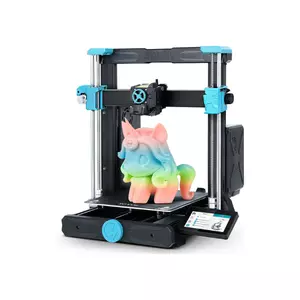
Sovol SV06 ACE Review
People's Choice

The Sovol SV06 ACE feels like a printer designed by makers for makers. Six weeks of evaluation revealed thoughtful details that make daily operation smoother – from the magnetic tool holder to the integrated camera mount. This machine balances accessibility with modification potential better than almost any budget printer I've tested.
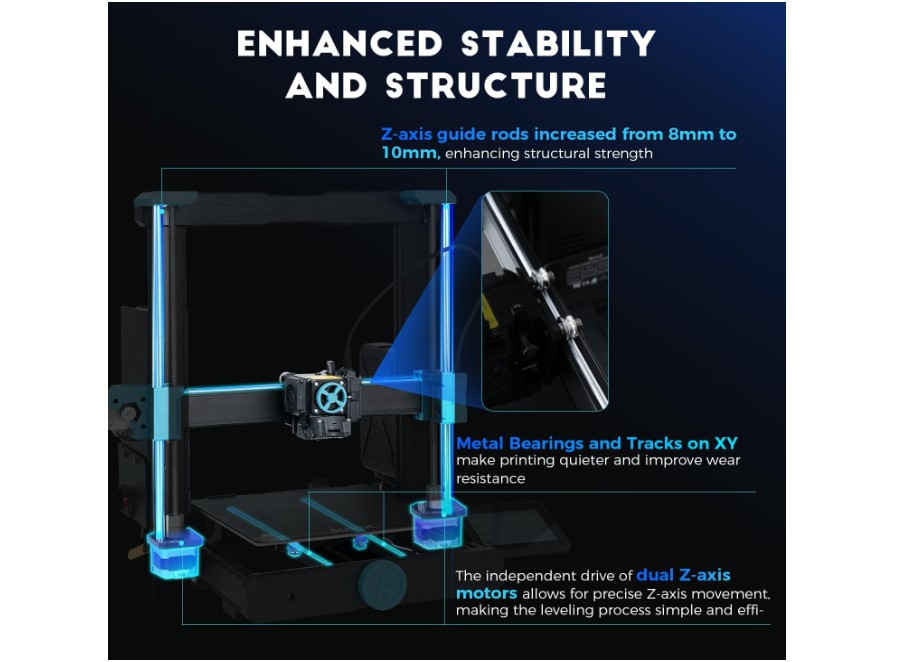
The automatic leveling system works reliably across the full 220×220mm build surface, creating detailed mesh compensation that handles moderate bed warping gracefully. The direct-drive extruder provides precise filament control that enables successful printing with flexible materials like TPU – something many budget printers struggle with. Print speeds up to 600mm/s sound impressive, but realistically expect excellent quality at 200-300mm/s for most materials.
Build quality strikes the right balance between cost and capability. The aluminum extrusion frame provides adequate rigidity for the claimed speeds, while the power supply and motion components feel substantial enough for long-term reliability. The magnetic PEI build surface offers excellent adhesion with easy part removal, and the spring steel backing maintains flatness better than glass beds over time.
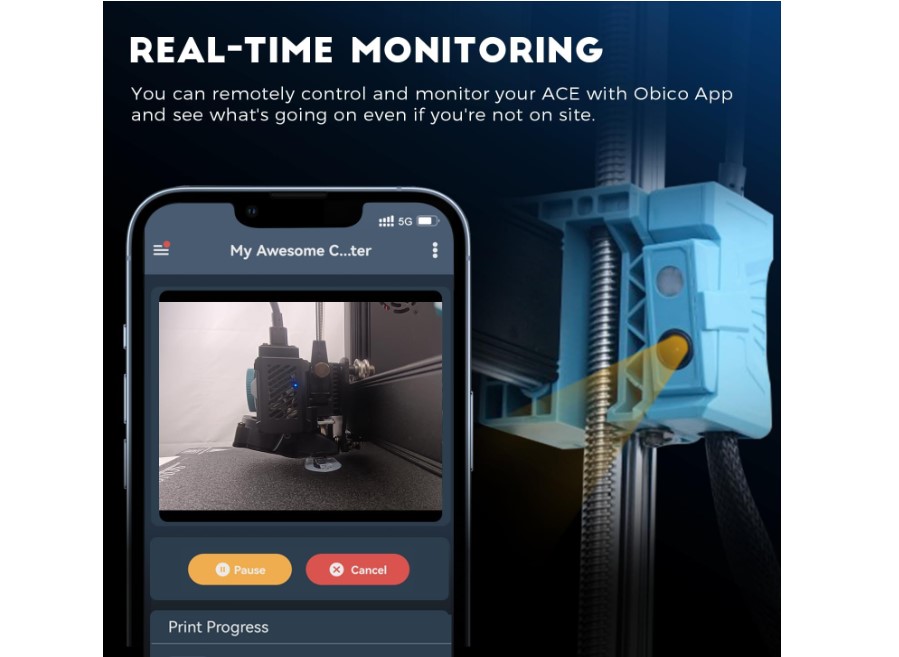
The integrated camera adds genuine utility for remote monitoring and time-lapse creation. Unlike aftermarket solutions, this camera positions optimally and integrates cleanly with the printer's aesthetic. Wi-Fi connectivity enables remote print monitoring and control through Sovol's mobile app, which provides basic but functional remote capabilities.
What sets the SV06 ACE apart is its modification-friendly design. Standard V-slot extrusions, common fasteners, and widely-available components make upgrades straightforward. The community has already developed numerous printable improvements, from tool holders to cooling duct modifications. Sovol actively supports this community with documentation and spare parts availability, creating an ecosystem that encourages experimentation without voiding warranties.
Pros:
- Excellent balance of price and features
- Direct-drive system handles flexible materials well
- Integrated camera for monitoring and time-lapse
- Modification-friendly design encourages upgrades
- Strong community support and documentation
Cons:
- Advertised maximum speeds require tuning to achieve
- Open frame design less suitable for ABS printing
Summary: The Sovol SV06 ACE appeals to users who want a capable printer with room to grow and modify. Its combination of solid baseline features, modification-friendly design, and community support makes it ideal for makers who view their printer as a platform for experimentation and improvement rather than a sealed appliance.
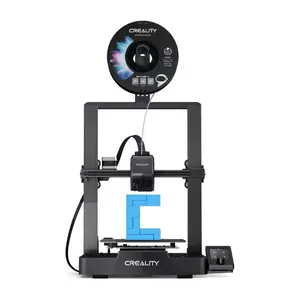
Creality Ender-3 V3 SE Review
Best Budget
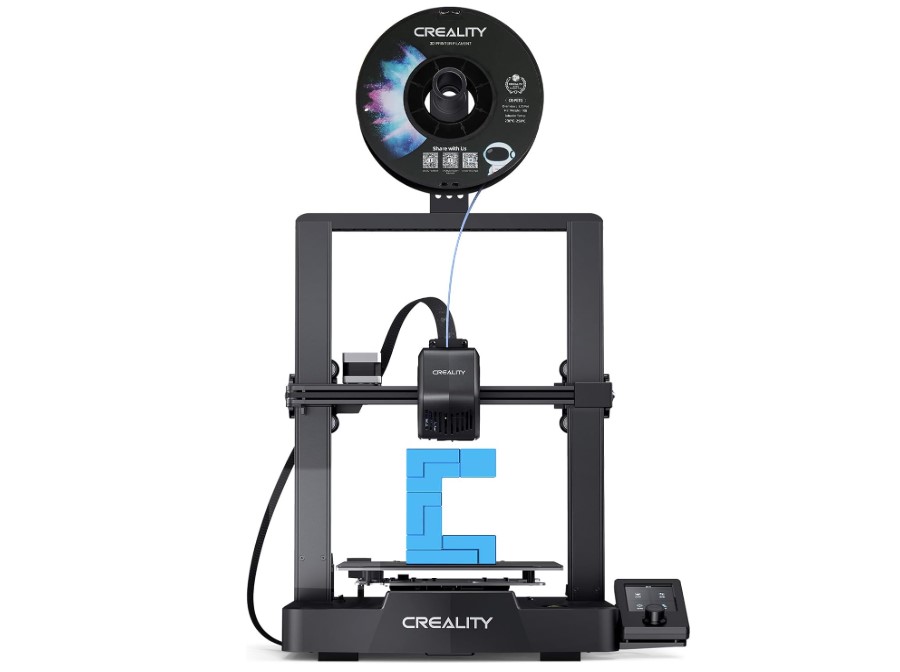
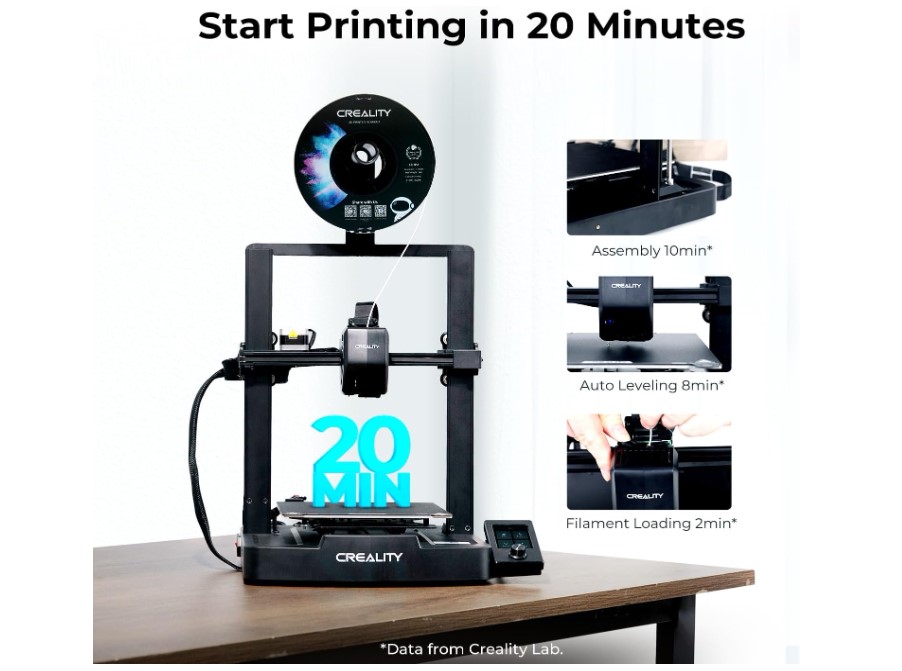

The Creality Ender-3 V3 SE represents the absolute floor for capable 3D printing, and remarkably, that floor has risen dramatically. When I first encountered Ender printers five years ago, they required hours of assembly and constant tinkering. This latest evolution assembles in 20 minutes and prints successfully straight out of the box – a transformation that makes quality 3D printing accessible to anyone with a modest budget.
The Sprite direct-drive extruder system brings flagship features to entry-level pricing. Unlike older Bowden setups that struggled with flexible materials and precise retractions, this direct-drive configuration handles everything from basic PLA to specialized filaments reliably. The shorter filament path reduces clogging issues and improves overall print consistency, particularly with materials that require precise flow control.
CR-Touch automatic leveling eliminates the tedious manual bed adjustment process that deterred many potential users from earlier Ender models. The system probes multiple points across the bed surface and automatically compensates for irregularities, while the automatic Z-offset detection using a strain sensor ensures optimal first-layer height without manual calibration. These features transform setup from an hours-long ordeal into a few minutes of automated preparation.
The 220×220×250mm build volume covers most beginner and intermediate printing projects. While not huge, it accommodates the vast majority of parts you'll actually want to print – from household organizers to replacement parts to educational models. The motion system supports speeds up to 250mm/s, though optimal quality typically occurs at 100-150mm/s depending on material and complexity.
Perhaps most importantly, the Ender ecosystem provides unmatched community support and upgrade potential. Spare parts remain widely available and affordable, while the massive user community has developed solutions for virtually any issue or modification you might consider. This printer serves as an excellent learning platform that won't leave you stranded when something goes wrong or when you're ready to experiment with improvements.
Pros:
- Exceptional value for capable 3D printing
- Direct-drive extruder handles diverse materials
- Automatic leveling eliminates setup frustration
- Massive community support and ecosystem
- Proven reliability with years of refinement
Cons:
- Open frame design requires stable environment
- Limited warranty and support compared to established brands
Summary: The Creality Ender-3 V3 SE proves that capable 3D printing no longer requires significant investment. While it lacks the advanced features of more expensive models, it delivers reliable printing performance and access to the largest community ecosystem in 3D printing. For budget fdm 3d printers or anyone wanting to explore 3D printing without major financial commitment, this represents an excellent entry point.
3D Printers under 400: FAQ

Image of budget 3d printers. Source: Canva
Extensive evaluation and conversations with hundreds of first-time 3D printer buyers revealed certain questions that surface repeatedly. Here are comprehensive answers based on real-world experience with these machines.
What ongoing costs should I expect with a budget 3D printer?
Filament represents the primary ongoing expense, typically costing $20-30 per kilogram for quality PLA. A kilogram prints roughly 400-500 small items or 50-100 larger objects depending on infill settings. Most users consume 2-4 kilograms per year of moderate printing. Resin costs significantly more at $30-50 per liter but offers higher detail. Additional costs include replacement nozzles ($2-5 each), build surface maintenance ($15-30 annually), and occasional part replacements like belts or thermistors ($5-20 each).
How difficult is it to learn 3D printing as a complete beginner?
Modern budget 3D printers have dramatically lowered the learning curve compared to earlier generations. Most users successfully complete their first prints within hours of setup. The key skills involve basic slicing software operation, simple troubleshooting, and material handling – all learnable through online tutorials and community guides. Expect 2-4 weeks to become comfortable with routine printing tasks and 2-3 months to handle most troubleshooting independently. Resin printing requires additional safety knowledge but offers simpler mechanical operation.
Can budget printers handle professional or commercial work?
Absolutely, with appropriate expectations. These machines excel at prototyping, small-batch production, custom fixtures, and replacement parts. Many small businesses use budget printers for end-use parts, marketing materials, and customer prototypes. Limitations include slower speeds than commercial machines, smaller build volumes, and potential reliability issues under constant operation. For occasional professional use or business exploration, budget printers provide excellent capability. High-volume commercial work typically justifies more expensive, industrial-grade equipment.
What's the difference between cheap printers and expensive ones?
Budget printers typically compromise on build volume, print speed, noise levels, and premium materials while maintaining core functionality. Expensive printers offer larger build areas, faster printing, quieter operation, better technical support, and advanced features like automatic material changing or enclosed chambers. However, print quality differences are often minimal – a properly tuned budget printer can match expensive machine output for most applications. The main advantages of expensive printers are convenience, speed, and capability rather than fundamental quality improvements.
Should I buy a kit or assembled printer?
Pre-assembled printers eliminate setup complexity and reduce the chance of assembly errors, making them ideal for users who want to start printing immediately. Kits offer lower prices and better understanding of machine mechanics but require 2-6 hours of careful assembly. Most budget printers now ship "semi-assembled" with major components pre-built and final assembly taking 30-60 minutes. Unless you enjoy mechanical assembly or want maximum cost savings, choose assembled options for convenience and reliability.
What software do I need, and how much does it cost?
Essential software includes a slicer program (converts 3D models into printer instructions) and optional 3D modeling software. Excellent free slicers include Cura, PrusaSlicer, and manufacturer-specific options like FlashPrint or ChiTuBox for resin printers. For 3D modeling, free options include Fusion 360 (personal use), Tinkercad (browser-based), and Blender (advanced). Most users can handle all their printing needs with completely free software – paid options mainly add convenience features or advanced capabilities for professional workflows.
Final Recommendations: Which Budget 3D Printer Should You Buy?
The budget 3D printer landscape has matured to the point where you can't make a truly bad choice among these five options. Each serves different priorities while delivering genuine printing capability that would have cost twice as much just two years ago.
For most users seeking the best value 3d printers, the ELEGOO Neptune 4 strikes the optimal balance. Its modern firmware, solid construction, and room for growth make it ideal for users who want to start with quality printing and expand their capabilities over time without immediately outgrowing their machine.
If ultra-fine detail matters more than versatility, the Anycubic Photon Mono M7 delivers resin printing quality that rivals machines costing twice as much. Accept the additional safety requirements and post-processing complexity for results that simply aren't achievable with FDM technology.
For classrooms, offices, or family environments where safety and simplicity matter most, the FlashForge Adventurer 3 provides the most foolproof experience. While it lacks the raw capability of open-frame alternatives, its enclosed design and maintenance-friendly features create an "appliance-like" experience that just works.
Tinkerers and makers who value modification potential should gravitate toward the Sovol SV06 ACE. Its standard components, community support, and upgrade-friendly design make it an excellent platform for learning and experimentation.
Finally, budget-conscious users shouldn't overlook the Creality Ender-3 V3 SE. It proves that capable 3D printing is now accessible at remarkably low prices, backed by the largest community ecosystem in the hobby.
The most important insight from extensive evaluation: any of these printers will successfully introduce you to 3D printing while delivering genuinely useful results. Choose based on your specific needs, environment, and budget – but don't overthink it. The technology has matured enough that your first printer won't be your last, and the skills you develop transfer between machines. Start printing, start learning, and enjoy the creative possibilities that unfold when you can manufacture custom objects on demand.

Jim's our tech geek with a mission since February 2023. From movies to video projectors, he knows his stuff and aims to make tech work for you. When he's not geeking out, he's there to guide you through making savvy decisions.